In Part 1 of this series, we explored the limitations of legacy approaches to securing access to privileged web applications—think jump servers, hardened browsers, and connector chaos. Now it’s time to move from theory to practice.
Starting with this post, we’ll walk through a series of real-world use cases, each showing how to modernize and secure access to different types of privileged web applications using an identity-first, browser-native approach.
Yes, you read that right—this is just the first use case. In total, we’ll cover four key scenarios, each reflecting a different challenge and architectural pattern:
- Legacy Web Apps with Basic Login/Password
- Modern Web Apps with SAML/OIDC – CyberArk Identity as the IdP
- Modern Web Apps with SAML/OIDC – CyberArk Identity is not the IdP
- Cloud Consoles (AWS, Azure, GCP)
In this post, we’ll dive into the first use case:
👉 Modernizing access to legacy privileged web applications that still rely on usernames and passwords.
Let’s explore how to modernize access to these privilege applications by extending PAM controls into the Access Management (AM) domain.
In the next step I will use CyberArk Identity Security Platform stack to explain and share with you how we can modernise and secure privilege web apps.
Onboarding a Web Application in CyberArk Identity
Onboarding a web application is the first and most essential step in securing user access. With CyberArk Identity, there are several ways to onboard a web application, depending on whether it’s already available in the catalog or needs to be configured manually.
Here are the main methods:
1. Application Catalog
CyberArk Identity offers a wide range of preconfigured applications that support secure Single Sign-On (SSO) out of the box. If the app you want to onboard is available in the catalog, it’s just a matter of a few clicks to add it and assign it to users.
2. Infinite Apps (App Capture)
For apps not listed in the catalog, you can use the Infinite Apps feature, available through the CyberArk Identity Browser Extension for Firefox.The built-in App Capture tool automatically identifies the login fields (username and password) on the app’s sign-in page and adds the app to your portal with SSO capabilities.
If automatic detection doesn’t work, you can manually select the required fields — making it easy to onboard virtually any username-password app.
3. Generic and Custom Templates
When the application isn’t in the catalog and App Capture isn’t suitable (e.g., for apps with complex authentication or NTLM-based logins), CyberArk Identity provides generic and custom templates.
You can choose from four types of templates, depending on the complexity of the application:
Custom user-password applications
Custom browser extension user-password applications
Custom Browser Extension (advanced) applications
Add and configure the generic NTLM and Basic application
I won’t dive into the differences between the custom templates here, but if you’re curious or need help choosing the right one, feel free to ask in the comments!
To show how simple it is to onboard a privileged web application, we’ll walk through the process using App Capture. This method doesn’t require advanced skills or extra services — it’s quick, intuitive, and works for nearly any web app.
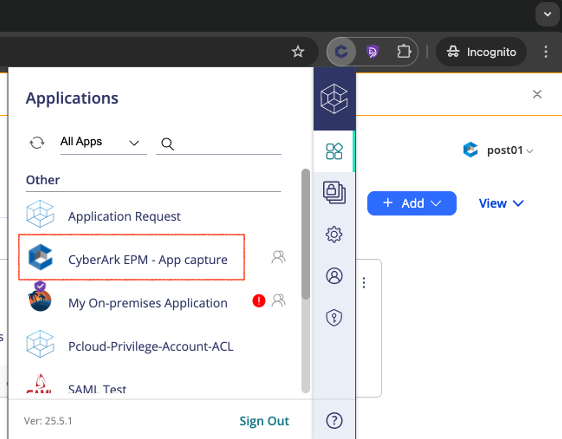
In this example, we’re onboarding a privileged web application: CyberArk’s Endpoint Privilege Management console. But the same steps apply to any other web-based app using username and password authentication.
Step 1: Sign in to Your CyberArk Identity Tenant
Start by logging in to your CyberArk Identity admin portal.
Step 2: Launch App Capture
- Click on Settings
- Expand the Advanced section
- Select Capture
This will launch the App Capture utility via the CyberArk Identity Browser Extension.
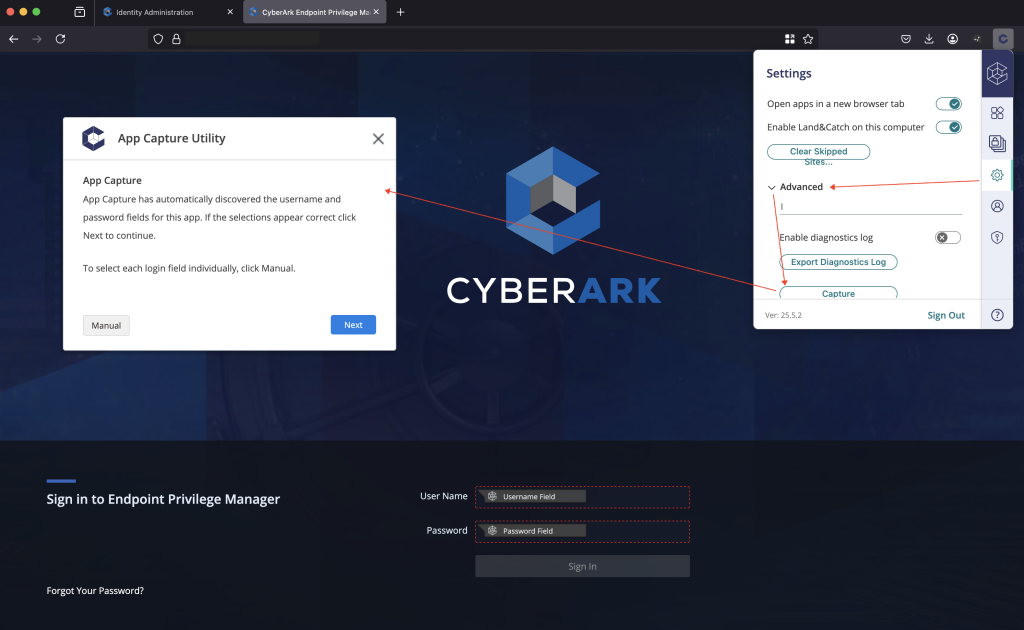
Step 3: Capture the Application
The utility will attempt to automatically detect the username and password fields on the login page. If it can’t, no worries — you can switch to manual mode and select the fields yourself.
In our case, the automatic option works just fine:
- Click Next
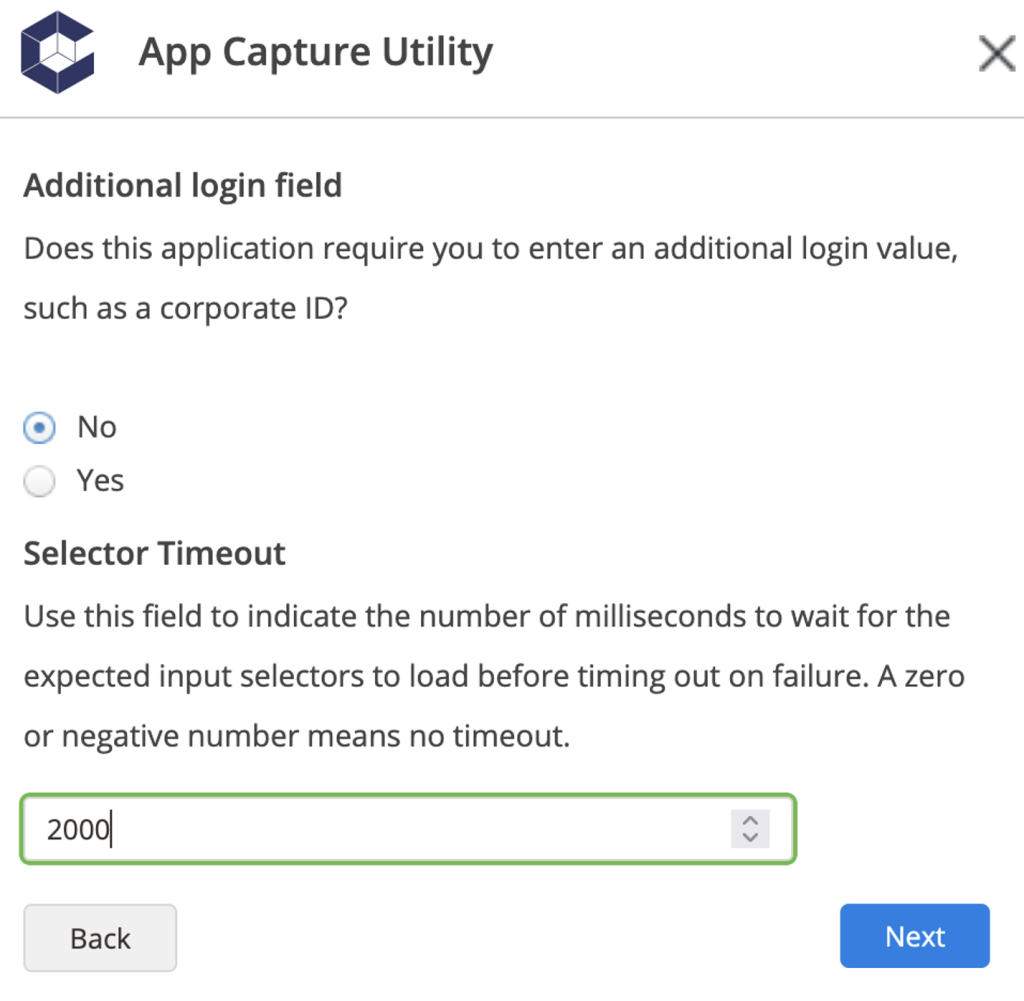
- Answer the few questions about the app
- Click Next again
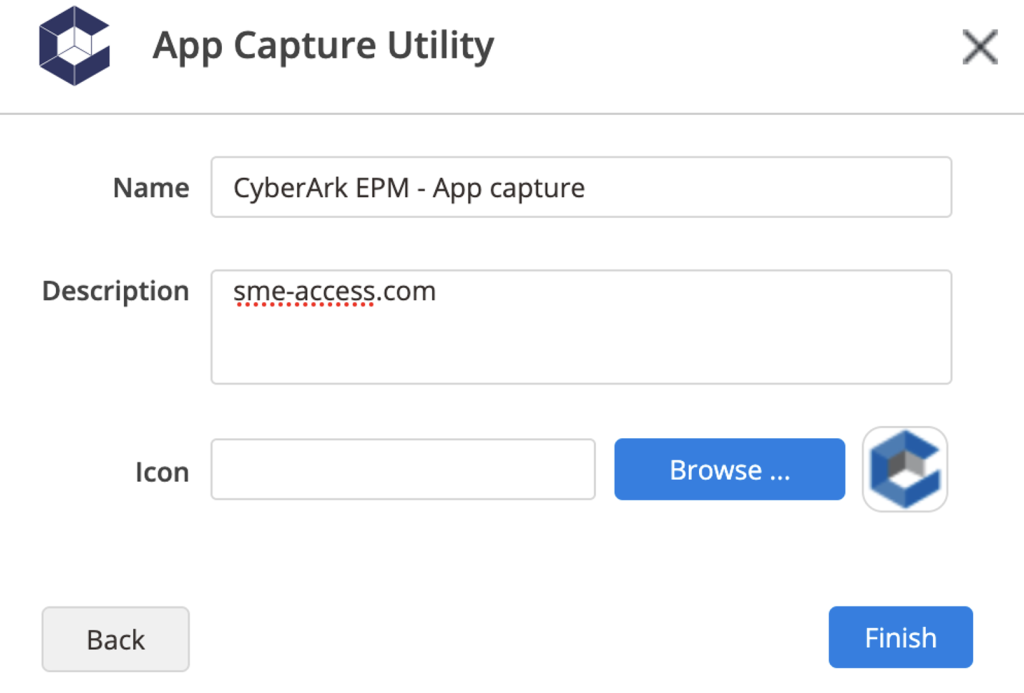
Step 4: Customize Your App
Give your application a name and adjust any optional settings.
When you’re ready, click Finish.
Step 5: Finalize and Deploy
- Add the app to your admin portal
- Click Submit
- Close the App Capture utility
That’s it! You’ll now see the newly onboarded application in your CyberArk Identity application list — ready to assign to users and apply intelligent privilege controls.
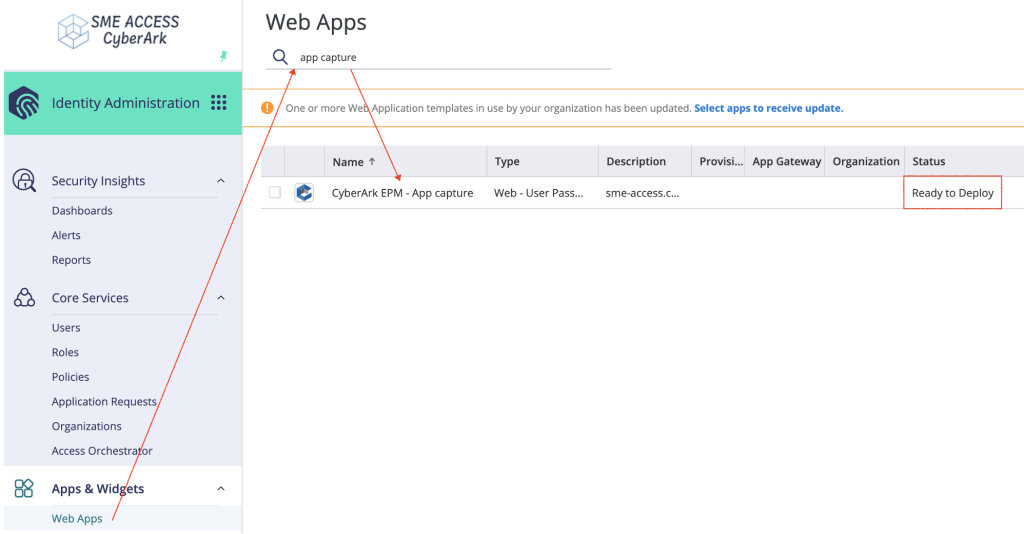
Now that our web application is onboarded, the next steps will guide you through setting up Web SSO using vaulted credentials.
🛡️ Step 1 – Secure Web SSO with Vaulted Credentials
We’ll start with the authentication layer—a crucial component, especially for privileged access.
Since this application still relies on a username and password, we’ll combine PAM controls with modern IAM concepts to achieve both security and usability:
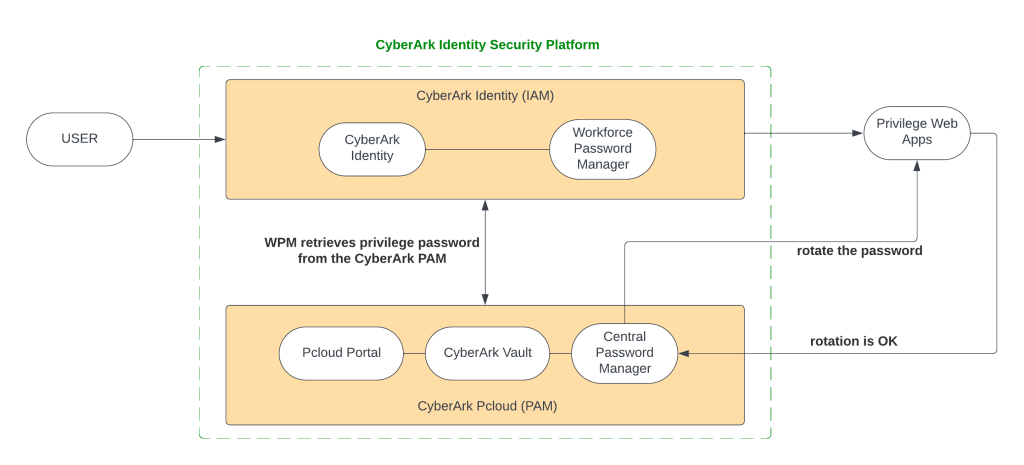
- The privileged credentials (username and password) are securely stored in a CyberArk Safe, where they are vaulted and rotated using the CyberArk Central Policy Manager (CPM).
- When a user initiates access, CyberArk Identity will retrieve the password securely at runtime, autofill it, and perform web SSO on behalf of the user.
✅ From a user experience perspective, this approach is seamless. Users access the app directly from their browser—no jump servers, no RDP, no latency.
✅ From a security perspective, the credentials are never exposed or known to the user. They are centrally managed, rotated, and tightly controlled within the PAM layer.
Now let’s do some practice.
I’ll assume that you have a basic understanding of CyberArk PAM and CyberArk Identity, both part of the CyberArk Identity Security Platform. If you need more details, feel free to ask in the comments.
🔐 CyberArk PAM – Onboarding a Privileged Web App Account
Step 1: Create a Safe
- Log in to CyberArk PAM as an admin.
- Go to Administration → Safes → Add Safe.
- Create a safe named EPM_Priv_Web_Apps, add a description, and complete the setup.
📖 Create and Manage Safes – CyberArk Docs
Step 2: Add Safe Member
- Open the EPM_Priv_Web_Apps safe → Members tab → Add Member.
- Add user: post01@sme-access.com
- Assign only these permissions:
- ✅ List Accounts
- ✅ Use Accounts
📖 Add Members to Safes – CyberArk Docs
Step 3: Add a Privileged Account
- Navigate to Accounts → Add Account.
- Select:
- Platform: Generic Web App
- Safe: EPM_Priv_Web_Apps
- Enter the app URL, username, and password.
- Save.
📖 Add Accounts – CyberArk Docs
🌐 CyberArk Identity – Assigning Users to the apps & Configuring Credentials
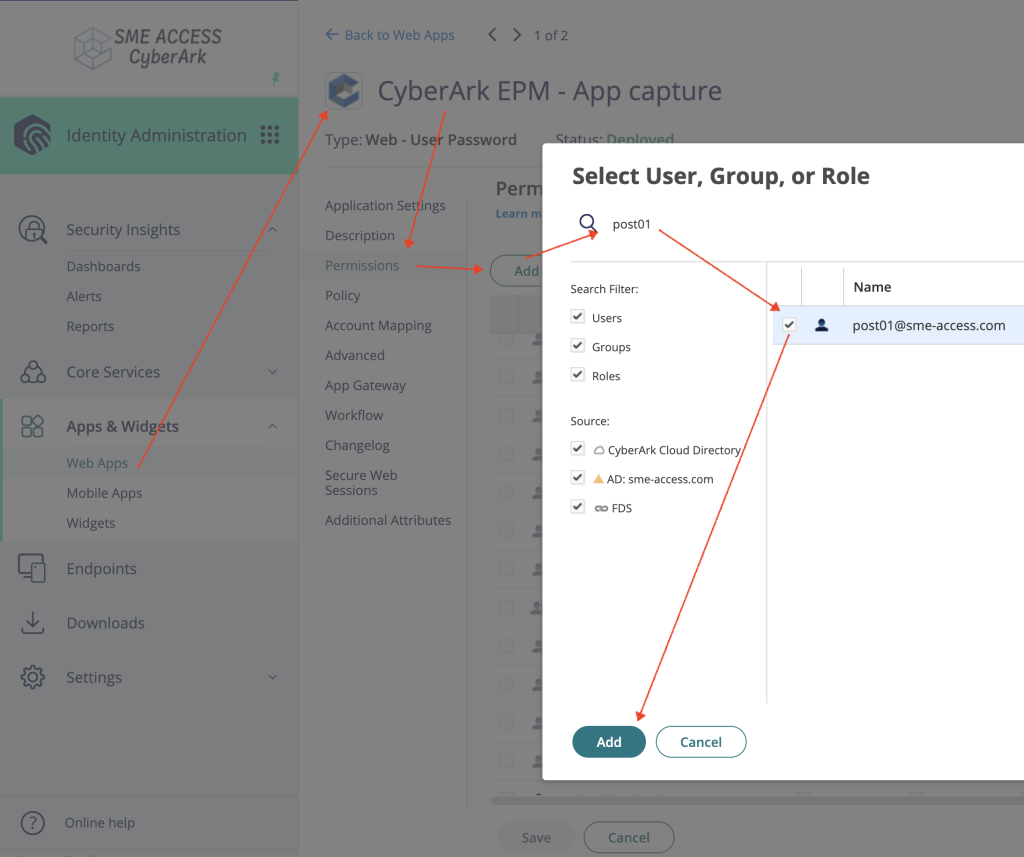
Step 1: Assign User to the Application
- In the CyberArk Identity Admin Portal, go to Apps.
- Click on the app onboarded previously (from Step 5: Finalize and Deploy).
- Click “Add User” and assign your users, AD groups or Identity role to the app. I’m using the user
post01@sme-access.com.
✅ Once assigned, the app status changes to Deployed.
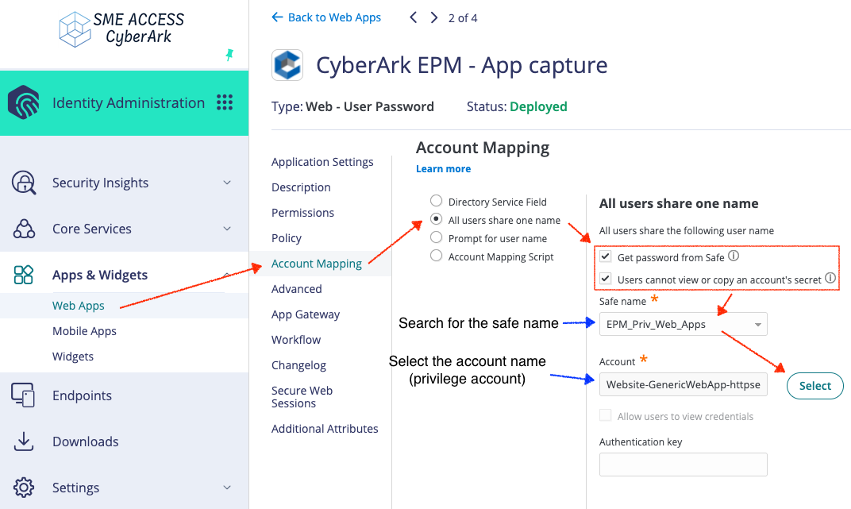
Step 2: Provide Privileged Credentials
- In the same app settings, go to the “Account Mapping” section.
- Set the login method to
All users share one nameand checkGet password from SafeandUsers cannot view or copy an account's secret - Search the safe name and select account name stored earlier in the
EPM_Priv_Web_Appssafe.
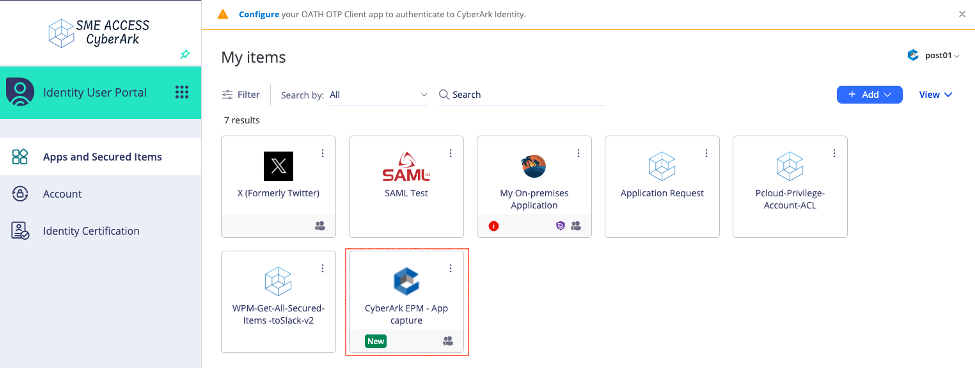
Step 3: Test the Connection
- Log in to the CyberArk Identity User Portal (https:/tenant-id.id.cyberark.cloud/my) as
post01@sme-access.comor your test user. - Launch the app from the portal or from the CyberArk Identity browser extension.
✅ CyberArk Identity will retrieve the credentials from PAM, autofill the login form, and complete SSO.
However, there’s a critical caveat here.
While the password isn’t visible, it still passes through the user’s browser session. This creates a potential attack vector—if the endpoint is compromised (malware, keylogger, malicious browser extension, browser exploit, etc), an attacker could hijack the session or extract the credential mid-flight.
That’s why this setup alone is not enough.
🧱 What’s Next? Defense in Depth
In the next blog, we’ll explore how to layer additional CyberArk Identity Security Controls to strengthen the architecture—enabling RBAC, Step-up MFA, workflow approval, least privilege, secure browsing, modern session isolation and recording, and continuous authentication and threat detection.
This way, we’re building a defense-in-depth strategy that secures access to critical assets without compromising user experience.
Let’s keep going 💪 and see you in the next blog
Enjoy !
شكرًا / Thank you / Merci